One of the most prominent features of a katana definitely is its hamon line. But what is the hamon line?
I am certain you have already seen it. Most likely you are just missing the right terminology.
For this reason, I will tell you what the hamon line is and tell you some facts about it.
Table of Contents
What exactly is the hamon line?

Let’s not waste any time.
The hamon line is most commonly found on differentially tempered swords. A popular example of this are katanas.
Most samurai had katanas which were differentially tempered. I will come back to differential tempering later on in this post.
Blades which are differentially hardened have two different zones.
One of them is the cutting edge (ha). The other region is the spine (mune). On katanas the cutting edge is harder than the spine. For example the spine has a hardness of 44 HRC and the edge 60 HRC.
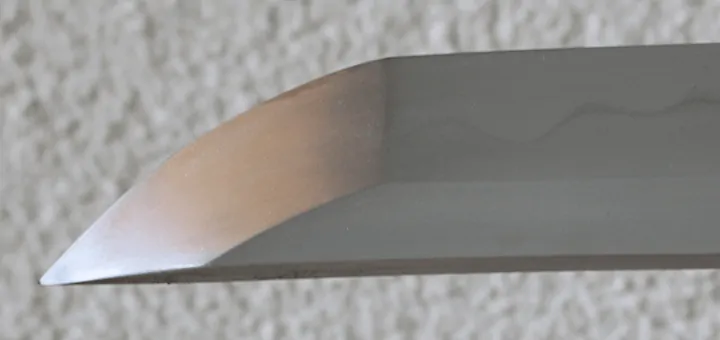
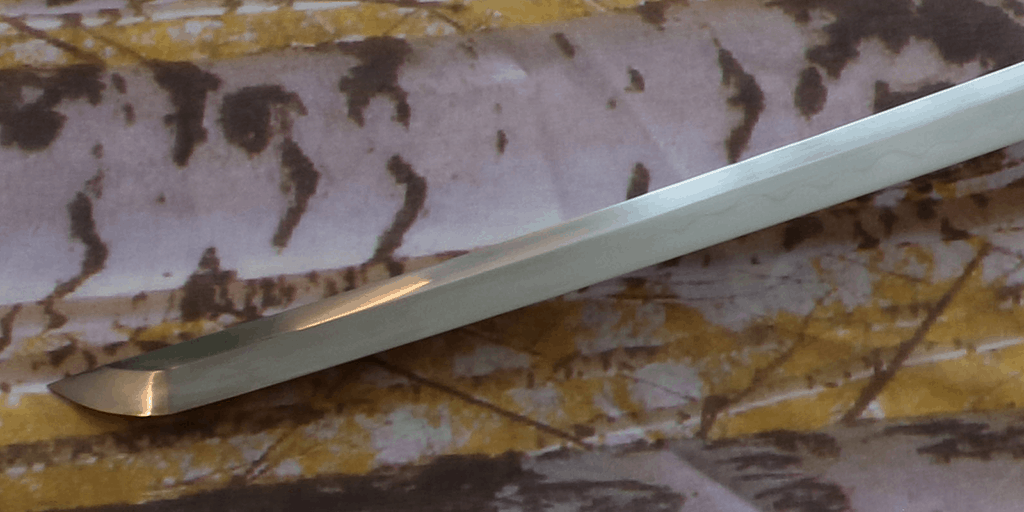
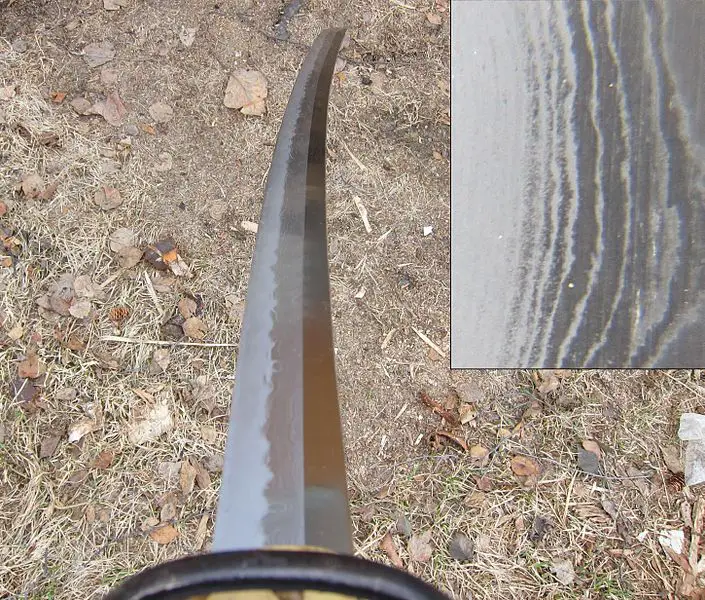
The hamon line is the hardened zone (yakiba) which contains the cutting edge (ha).
It outlines the transition between the region of harder martensitic steel at the blade’s edge and the softer pearlitic steel at the back of the sword.
The hamon line is a bit brighter than the regular steel on the back of the blade. This visual effect is very sought after. From a design perspective, it looks very pleasing to the human eye.
Therefore, it makes sense that a lot of people prefer swords with a hamon line. Nowadays even some European swords are forged with a hamon line.
From a historical standpoint, European swords with a hamon line are extremely unrealistic. However, no one can deny the positive aesthetic effect of the hamon line on the overall look of the sword.
How is the hamon line created?
As mentioned before the hamon line is created during a process called differential tempering. Most people also refer to it as clay tempering. Since that is exactly what is it.
In the sword forging process, the heat treatment is one of the last, but most important steps to create a perfect sword. During the tempering process, the spine of the blade gets covered in a thin clay layer.
The next step is to heat the blade to the desired temperature depending on the steel used. After that, the sword gets quenched in water or oil.
When quenching the blade the edge cools much faster than the spine (which is covered in clay). Therefore two regions with different hardness are created.
The hamon line shows the location were little to no clay was applied. While the other part looks a bit darker and was covered in a clay layer.
Most high-quality katanas are differentially tempered. During the quenching process the entire blade can break. Therefore the smiths have to pay a lot of attention.
As mentioned before you can either use water or oil for quenching the blade. While water is the riskier option it creates a more prominent hamon line.
Oil is the safer approach. However, the hamon doesn’t stand out as much. Therefore, the swordsmiths might use methods to artificially create or enhance the hamon.

Another noteworthy fact is that when quenching the blade with oil the blade doesn’t curve as much. Oil quenching is commonly used for industrial purposes with the goal to bend the blade as little as possible.
Even though a straight blade might seem like a good choice, the curvature of a katana is a key characteristic. In order to explain the effects of the curvature, I wrote an entire article about the curvature of the Japanese katana.
One important thing to note is that the hamon line is merely a side effect of the clay tempering process. Swordsmiths surely didn’t perform this complicated process for aesthetic purposes.
So why exactly did they differentially temper their blades?
Effects of the differential tempering
If the hamon line is not the reason for clay tempering what exactly is it? In my opinion, the answer to this isn’t as easy as it might seem.
The first and most important aspect of differential tempering is the two different hardness zones which are created.
A sword with a harder edge and softer spine is very advantageous. First of all the edge is able to take and keep a sharper edge. A blade with Rockwell hardness 60+ slices through everything with ease.
However, the main disadvantage of very hard blades is their brittleness. Harder blades crack and break more easily. For this reason the Japanese did cover their spine in clay.
This allowed them to support the hard edge with a softer spine. When they attacked an enemy the spine absorbed a lot of the impact.
Due to this, the swords didn’t break as easily as the Japanese were used to. After all they didn’t use differential tempering from the beginning.
Because of the bad durability of their blades they had to come up with something better. Differential tempering has proven to be reliable and makes up better blades.
Fake Hamon
Yeah, hamons can be created artificially. At least, in my opinion, that’s a bad thing. First of all let me tell you what you have to look out for in order to spot a fake hamon.
First things first, if your blade isn’t differentially tempered it certainly is a fake hamon. There’s nothing more to add. No differential tempering no real hamon.
A more advanced way to look at this problem is using the “nioi”. It is a bright, speckled line, which is a few millimetres wide. It follows the entire length of the hamon. The nioi is best viewed at long angles and cannot be faked (at least by today’s technology).
I have never used this tactic myself as I know which of my katanas have a real and which a fake hamon line. I think there is no shame in using a fake hamon line.
For some steels differential tempering just isn’t necessary. This especially applies to spring steels, which are very flexible already. They can be bent to almost 90° and always spring back true.
There is no need to increase durability further.
Now to the question of how a fake hamon line is created. To tell you the truth there are many different options.
For the sake of simplicity, I will cover the main three approaches.
The cheapest method is called wire brushing. It is commonly used on extremely cheap katanas which are mostly used for display only purposes.
I think you can easily spot the difference between a wire-brushed and a real hamon as well. A few weeks ago I found a nice article that contains images of the various fake hamon.
Another method to fake the hamon line is called acid etching. For a beginner, this might seem like a real hamon. However, chemicals were applied to etch the hamon in the blade.
The main difference between an acid etched and real hamon is that a real hamon can only be viewed from a specific angle. Whereas the fake hamon is visible at all angles.
The third method to create a fake hamon is called sandblasting. This process isn’t as commonly used as the other two, but it also provides a seemingly real hamon line.
Conclusion
Here is a quick summary of everything we covered in this article.
The hamon line is the part of a sword which has a different hardness than the other region. In general, the hamon line is located at the edge of the blade.
The hamon line is a side effect of the clay tempering process. On cheap katanas the hamon line is oftentimes faked through various artificial methods.
If you keep these things in mind you surely know a lot about the hamon line. See you next time!